Eian Kantor


Liam Frankland


Chuck Haupt


14th January 2019- Eian Kantor
This week we properly started our next project. I have decided to start with Eian Kantor. Eian Kantor is a photographer and visual storyteller based in Brooklyn, New York. He's a regular contributor to 'The Riverdale Press' and he's a member of the National Press Photographer Association (NPPA).
Below are some of his photographs:


Image Analysis
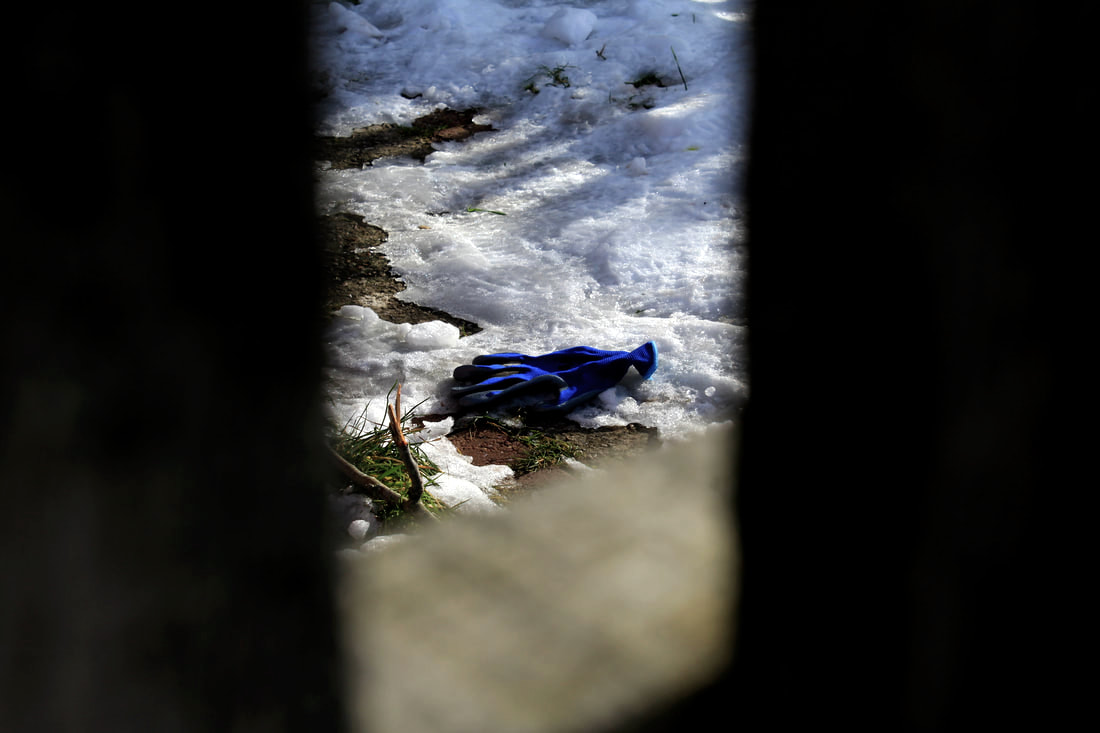
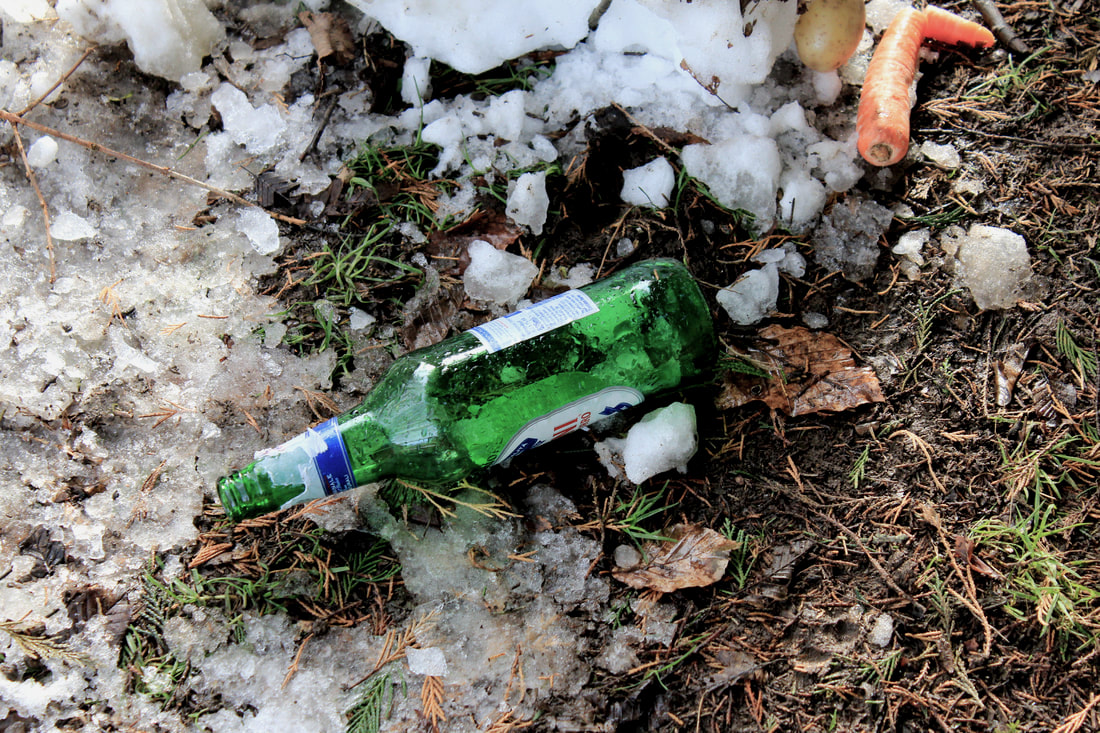
The title of this piece is unknown but it is one of many images in his 'Found Sculptures' project. It is by Eian Kantor. It's unknown when it was created.
It is an example of street photography. The composition shows a broken red stop sign lying sideways against a red brick wall. The stop sign is in the middle ground of the image and its spread out over the bottom thirds. The red sign contrasts really well with the white wall and black pavement making it the focal point of the image. The horizontal lines created in this photograph by the wall, wires, sign, and pavement guide your eye towards the red stop. The shadows underneath the pipes create an illusion of depth making the image look more 3D and more realistic. The colours in this photo are quite cold and dull but the red makes the image look more fun and interesting for whoever is viewing it. The techniques used in this image are lighting, angle, zoom, ISO, aperture, shutter speed and white balance. The lighting in this image looks pretty natural so I don't think any flash has been used. The photo doesn't seem to be blurred anywhere so I think the photographer has used aperture settings of f/22. As the photo isn't very blurred the depth of field is quite deep. The shutter speed has been set to 1/80 and the ISO has been set to 800. There doesn't seem to be any noise in the photo apart from on the pavement but that might just be it being dirty and not have any actual noise. The white balance seems to be set to cloudy and the colour temperature to 6000K as the photo doesn't seem to be too bright but not too dark either. The photographer has used a traditional DSLR camera as this photo has been taken not too long ago,
Shoot Plan
It won't be very necessary for me to go all the way to town for this shoot because all I'm pretty much going to be photographing is rubbish and my neighbourhood will be enough for that. I will go to town anyway to take more varied pictures so it's not only photos of food packets, receipts etc. but also bin bags and other larger pieces of rubbish. I will aim to take at least 20 pictures and after I've done that I will slightly edit the contrast and brightness to make my pictures look a little bit more like my chosen photographers pictures.
It won't be very necessary for me to go all the way to town for this shoot because all I'm pretty much going to be photographing is rubbish and my neighbourhood will be enough for that. I will go to town anyway to take more varied pictures so it's not only photos of food packets, receipts etc. but also bin bags and other larger pieces of rubbish. I will aim to take at least 20 pictures and after I've done that I will slightly edit the contrast and brightness to make my pictures look a little bit more like my chosen photographers pictures.
The shoot


Editing Process


For this shoot I edited my photos in a very similar way. I lowered the brightness, contrast and saturation to "mute" the colours on the photo and I slightly raised the curves not make my images look so dull.
Final Images
I have photographed bins, bin bags and rubbish around Bath City Center.
The settings/techniques I've used are
What went well was that I managed to take over 20 photos and I made my pictures look quite similar to my chosen photographers images by editing them in a similar way.
I have learnt to use zoom and angle to make my photos look more professional and interesting than they really are.
My target for the next shoot is to try and take over 20 images and in order to make my pictures look more professional I'd want to try out different settings on my camera.
21st January 2019- Liam Frankland
For this weeks shoot I will be using Liam Frankland as an inspiration. Liam Frankland is a observational photographer who incorporates landscape, seascapes, urban environments and life paraphernalia into his body of work. He also explores methods of abstract photography within his work ethic. He has done quite a lot of projects and I'm going to be using his 'lost and found' project as inspiration for this weeks shoot.
Below are some of his photographs from his 'lost and found' project:


Image Analysis
The title of this piece is 'Pink Umbrella'. It is by Liam Frankland. It was created between 2007 and present day. It is an example of street photography. The composition shows a pink broken umbrella that seems to have been abandoned on the street. It is placed in the upper right third of photo in the upper mid-ground. The focal point of the image is the pink umbrella. The yellow lines on the road and the pavement guide your eye towards it. The blur in the photo also seems to be dragging your eye towards the umbrella. The pink umbrella stands out against the black road making it seem like the most interesting part of the image. The yellow stripes allow your eye to travel towards the umbrella. The photographer could've positioned the camera so that all the lines are travelling in a straight line but instead he chose to angle the camera so that the pavement emphasises the focal point which is the umbrella. From the shadow created from the umbrella I can tell that it was a sunny day and that no flash has been used whilst taking the picture. The techniques used here are ISO, aperture, shutter speed, angle, rule of thirds, manual focus and lighting. The picture looks quite bright so alongside the natural lighting ISO of about 200 has been used. The photographer has previously said he uses aperture of F/1.8 during his 'lost and found' project. I don't think anything was moving in the photo so the shutter speed shouldn't be too high; from 50-100. I think the white balance has been used between 5000-6000. The photographer has used a 50mm F/1.8 lens to create this image.
The title of this piece is 'Pink Umbrella'. It is by Liam Frankland. It was created between 2007 and present day. It is an example of street photography. The composition shows a pink broken umbrella that seems to have been abandoned on the street. It is placed in the upper right third of photo in the upper mid-ground. The focal point of the image is the pink umbrella. The yellow lines on the road and the pavement guide your eye towards it. The blur in the photo also seems to be dragging your eye towards the umbrella. The pink umbrella stands out against the black road making it seem like the most interesting part of the image. The yellow stripes allow your eye to travel towards the umbrella. The photographer could've positioned the camera so that all the lines are travelling in a straight line but instead he chose to angle the camera so that the pavement emphasises the focal point which is the umbrella. From the shadow created from the umbrella I can tell that it was a sunny day and that no flash has been used whilst taking the picture. The techniques used here are ISO, aperture, shutter speed, angle, rule of thirds, manual focus and lighting. The picture looks quite bright so alongside the natural lighting ISO of about 200 has been used. The photographer has previously said he uses aperture of F/1.8 during his 'lost and found' project. I don't think anything was moving in the photo so the shutter speed shouldn't be too high; from 50-100. I think the white balance has been used between 5000-6000. The photographer has used a 50mm F/1.8 lens to create this image.
Shoot Plan
For this shoot I'm going to photograph items around my local area and in gardens of things they might've forgotten about and lost. After the shoot I will slightly edit my photos on the computer.
For this shoot I'm going to photograph items around my local area and in gardens of things they might've forgotten about and lost. After the shoot I will slightly edit my photos on the computer.
The shoot


Editing Process


For this shoot I did a bit more editing than usual. I firstly started off by raising the levels to make the colours stand out more so later on I can dull them to make my pictures look more similar to my chosen photographers. After that i raised the exposure and gamma correction and lowered the saturation and vibrance. Overall, the goal of the editing was to make the images look lifeless and discarded so they link in with my theme more.
Final Images
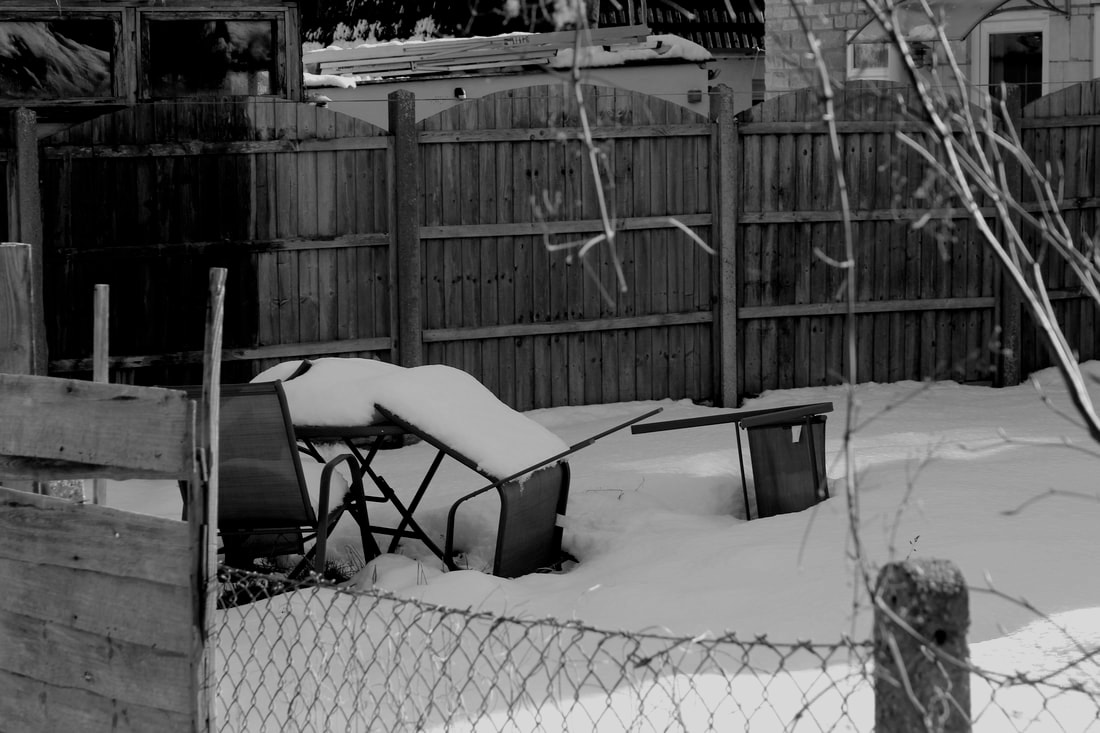
I have photographed abandoned looking items in gardens and around my neighbourhood.
The settings/techniques I have used are natural lighting, editing, manual focus, rule of thirds, aperture of f/5.6-f/10, ISO of 100-500, and shutter speed of 1/160.
What went well was that I managed to take over 20 pictures and demonstrated a good use of rule of thirds which makes my photos look more advanced.
I think my shoot could be even better if i took more photos looking through things like fences as i did in the first final image,
My target for next shoot is to carry on using the rule of thirds in my pictures and to take at least 20 images.
28th January 2019- Chuck Haupt
This is my last week I'll be using photographers as an inspiration before going on to explore my own style. This week I will be focusing on Chuck Haupt. Chuck Haupt is a New York based photographer who was a photo-journalist for 36 years. Now he's gone back to photographing nature. His discarded items photos show items from the 2011 flood in the Southern Tier of New York.
Below are some of his photographs:


Image Analysis
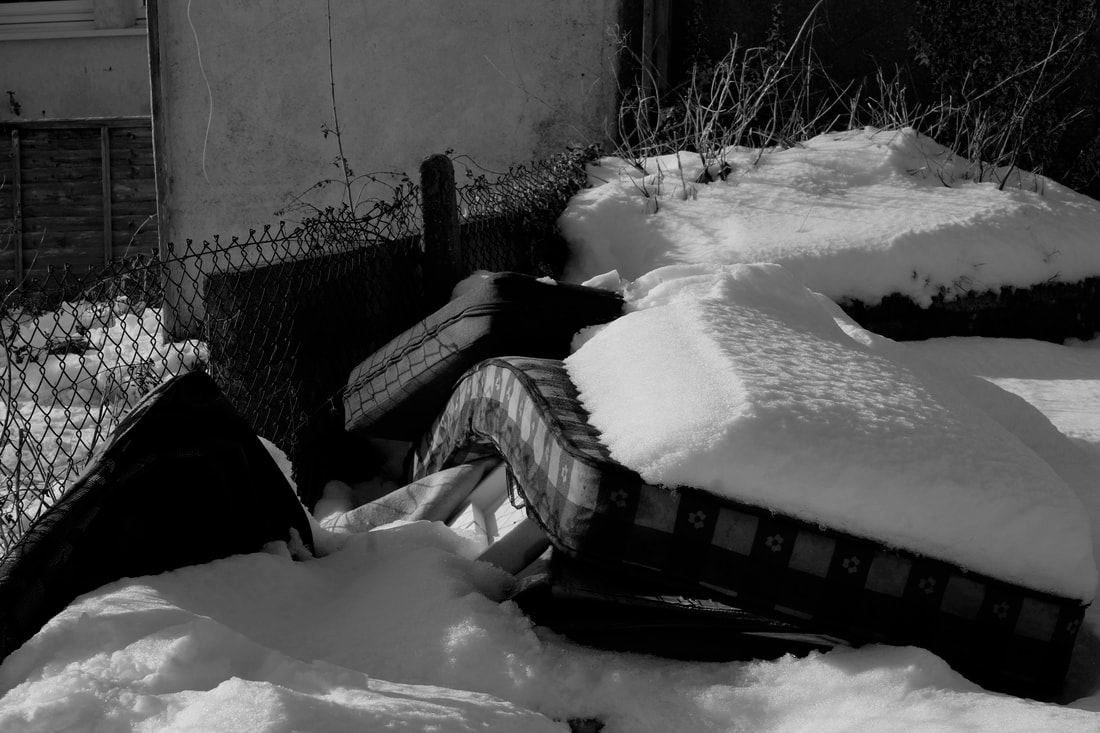
The title of this piece is unknown. It is by Chuck Haupt. It was created in 2011. It is an example of street photography. The composition shows a discarded desk with some items behind it following the 2011 flood in the Southern Tier of New York. The desk is the focal point in the image which is taking up most of the middle third and it's also placed in the middle ground of the photo. The items behind the desk look like they have a soft texture, but the mattress also looks as if its soaked with water because of the flood. The wooden desk, the focal point of the image, seems to have a smooth, delicate-like texture especially the left side panel. The lines created in this image glide your eye towards the desk. From where the photographer is standing it looks like the items are positioned diagonally going the same direction as the pavement and the lines where the grass cuts off. To me the colours in the photograph, which are black and white, seem to express the mood of the people at the time as it must've been a very traumatic experience for everyone. Everyone was sad, devastated and traumatised which the colours demonstrate. If the photographer hadn't of changed the colours in the image it would've been a much more happy/uplifting photo. The photo has a pretty dark tone to it. As the photo has been edited I can't really tell what type of lighting has been used but from my own knowledge I think no flash has been used. The front of the desk looks shiny which I think is the result of the camera settings used and not flash. I think shutter speed of about 1/125 has been used as there don't seem to be any moving objects. The aperture used to create this photograph is f/22. I think the white balance settings have been set to 6000K. The photographer has used a traditional DSLR camera.
The title of this piece is unknown. It is by Chuck Haupt. It was created in 2011. It is an example of street photography. The composition shows a discarded desk with some items behind it following the 2011 flood in the Southern Tier of New York. The desk is the focal point in the image which is taking up most of the middle third and it's also placed in the middle ground of the photo. The items behind the desk look like they have a soft texture, but the mattress also looks as if its soaked with water because of the flood. The wooden desk, the focal point of the image, seems to have a smooth, delicate-like texture especially the left side panel. The lines created in this image glide your eye towards the desk. From where the photographer is standing it looks like the items are positioned diagonally going the same direction as the pavement and the lines where the grass cuts off. To me the colours in the photograph, which are black and white, seem to express the mood of the people at the time as it must've been a very traumatic experience for everyone. Everyone was sad, devastated and traumatised which the colours demonstrate. If the photographer hadn't of changed the colours in the image it would've been a much more happy/uplifting photo. The photo has a pretty dark tone to it. As the photo has been edited I can't really tell what type of lighting has been used but from my own knowledge I think no flash has been used. The front of the desk looks shiny which I think is the result of the camera settings used and not flash. I think shutter speed of about 1/125 has been used as there don't seem to be any moving objects. The aperture used to create this photograph is f/22. I think the white balance settings have been set to 6000K. The photographer has used a traditional DSLR camera.
Shoot Plan
For this shoot I'm going to walk around my neighbourhood and take pictures of any abandoned/abandoned looking items like furniture or toys. Afterwards I'll edit my photos on photoshop to make them more similar to my chosen photographers images,
For this shoot I'm going to walk around my neighbourhood and take pictures of any abandoned/abandoned looking items like furniture or toys. Afterwards I'll edit my photos on photoshop to make them more similar to my chosen photographers images,
The shoot


Editing Process


Firstly I converted the final images into black and white, Afterwards I raised the levels slightly to make the colours more bold and so they're not so bland. My last step was lowering the exposure and raising the gamma rays in order to make my images look darker and to make them seem older.
Final Images

I have photographed discarded/abandoned looking items in gardens around my neighbourhood.
The settings/techniques I have used are
What went well was that I managed to take a range of photographs that are quite similar to Chuck Haupt's images as both mine and his portray abandoned items. I also managed to take over 20 photos.
I think my shoot could be even better if I experimented on photoshop and tried different editing techniques.
My target for next shoot is to carry on aiming for over 20 photos and to explore a different field of abandoned items for example abandoned buildings.
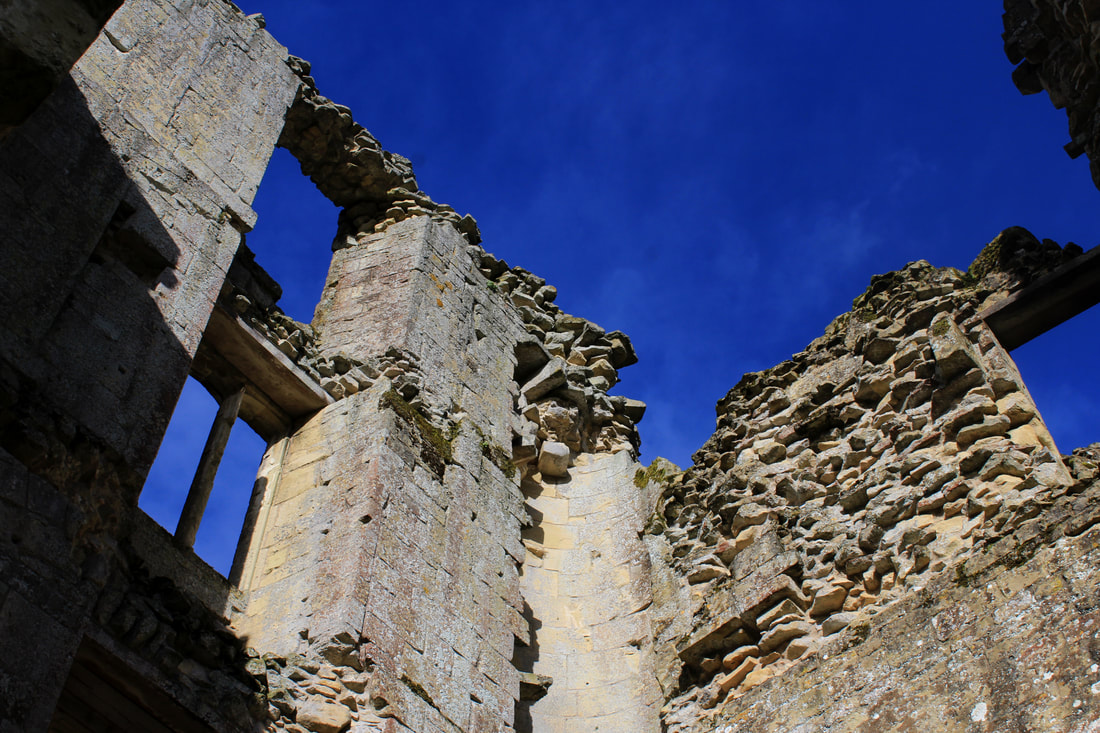
7th March 2019- Shoots 4+5
After looking at my chosen photographers I have decided to focus on a different aspect of discarded items. For this weeks shoot I will focus on discarded/abandoned buildings and I will go to the HM Prison Shepton Mallet to do my shoot. The prison opened in 1625 and closed down in 2013 making it the longest running prison in the United Kingdom. I will try to focus on close up shots of walls and looking though things like bars and fences.
After looking at my chosen photographers I have decided to focus on a different aspect of discarded items. For this weeks shoot I will focus on discarded/abandoned buildings and I will go to the HM Prison Shepton Mallet to do my shoot. The prison opened in 1625 and closed down in 2013 making it the longest running prison in the United Kingdom. I will try to focus on close up shots of walls and looking though things like bars and fences.


Editing Process


I didn't do much editing during this shoot because I didn't think it was too necessary apart from adjusting the levels. All I wanted to do is enhance the colours. I also adjusted the gamma correction and brightness on some of the other final images.
Final Images
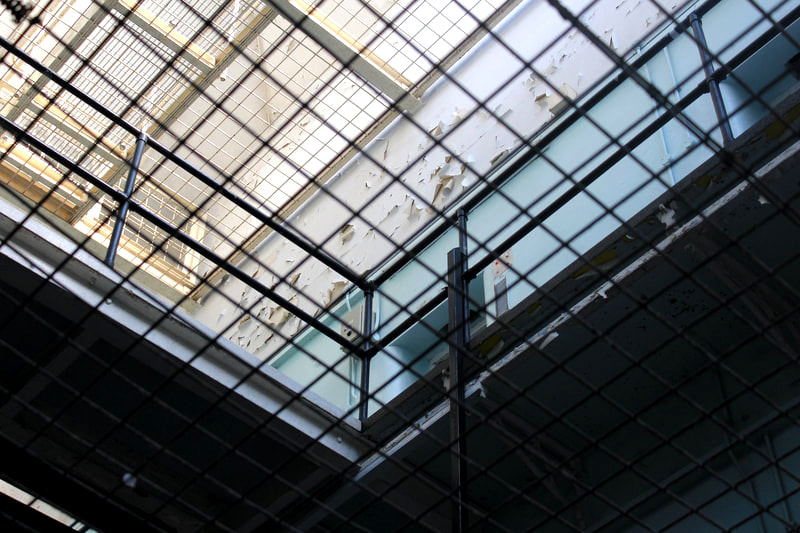

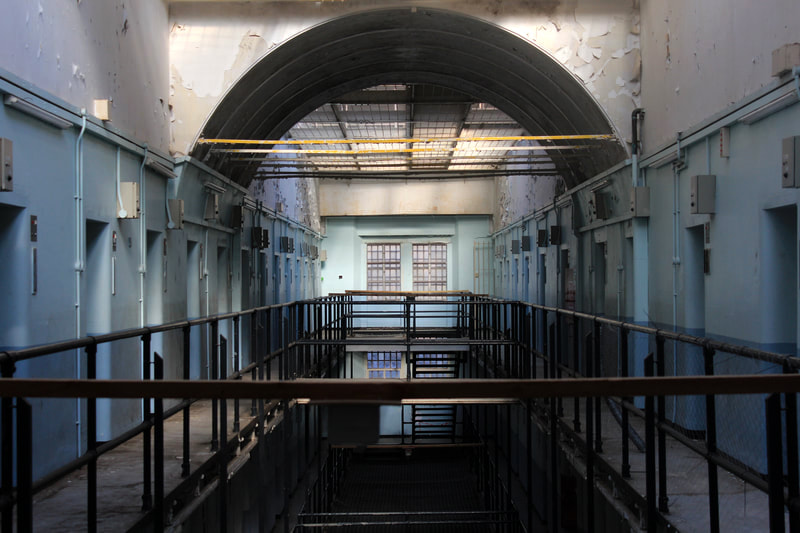
I have photographed an abandoned prison I visited.
The settings/techniques I have used are natural lighting, manual focus, photoshop, rule of thirds, aperture from f/4 to f/5, ISO from 200 to 3200 and shutter speed of 1/250.
What went well was I managed to capture a wide range of photographs that vary from each other and I was able to take over 24 images. I think I also managed to achieve good composition which is unusual and even abstract at times.
I think my shoot could be even better if I edited some of my pictures in black and white to have a comparison.
I have learnt to consider the composition in my photos to make them look more interesting and developed.
My target for next shoot is to keep thinking about the composition and to carry on looking at more abandoned/discarded buildings.
14th March 2019- Shoot 6+7
For this weeks shoot I decided to carry on looking at abandoned/discarded buildings as I thought my previous shoot was very successful so why not try and improve it. This week I visited the 'Old Wardour Castle' located near Tisbury. It was built in the 1390s and partially destroyed in 1643 and 1644 during the English Civil War.
For this weeks shoot I decided to carry on looking at abandoned/discarded buildings as I thought my previous shoot was very successful so why not try and improve it. This week I visited the 'Old Wardour Castle' located near Tisbury. It was built in the 1390s and partially destroyed in 1643 and 1644 during the English Civil War.
Shoot Plan
For this shoot I'm going to focus on trying to photograph looking through things like through cracks in the wall or through doorways/ where the windows used to be. Afterwards I will edit my pictures on photoshop. I won't make any big changes to the pictures apart from adjusting the levels.
For this shoot I'm going to focus on trying to photograph looking through things like through cracks in the wall or through doorways/ where the windows used to be. Afterwards I will edit my pictures on photoshop. I won't make any big changes to the pictures apart from adjusting the levels.
The Shoot


Editing Process


I haven't made any great changes apart from adjusting the levels and gamma corrections because I didn't want to over complicate the pictures. I feel like they're powerful enough in themselves so doing any major corrections will result in them losing their awe and uniqueness. All I wanted to achieve through the editing is making the colours more bold to make them standout more.
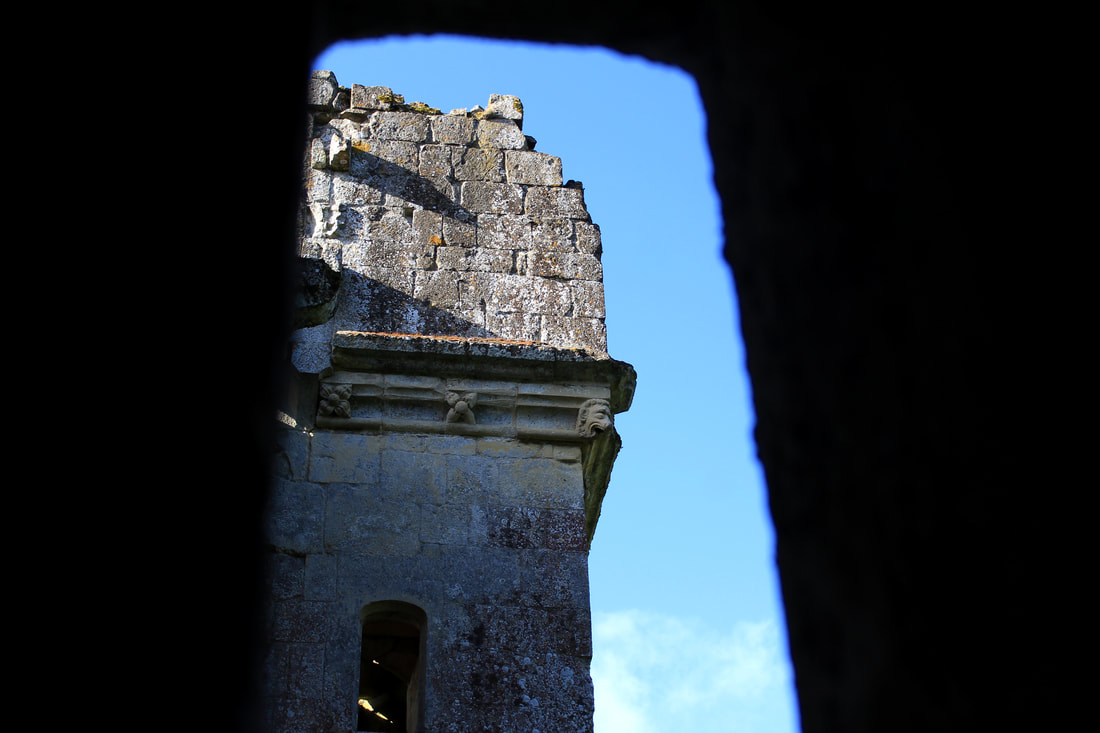
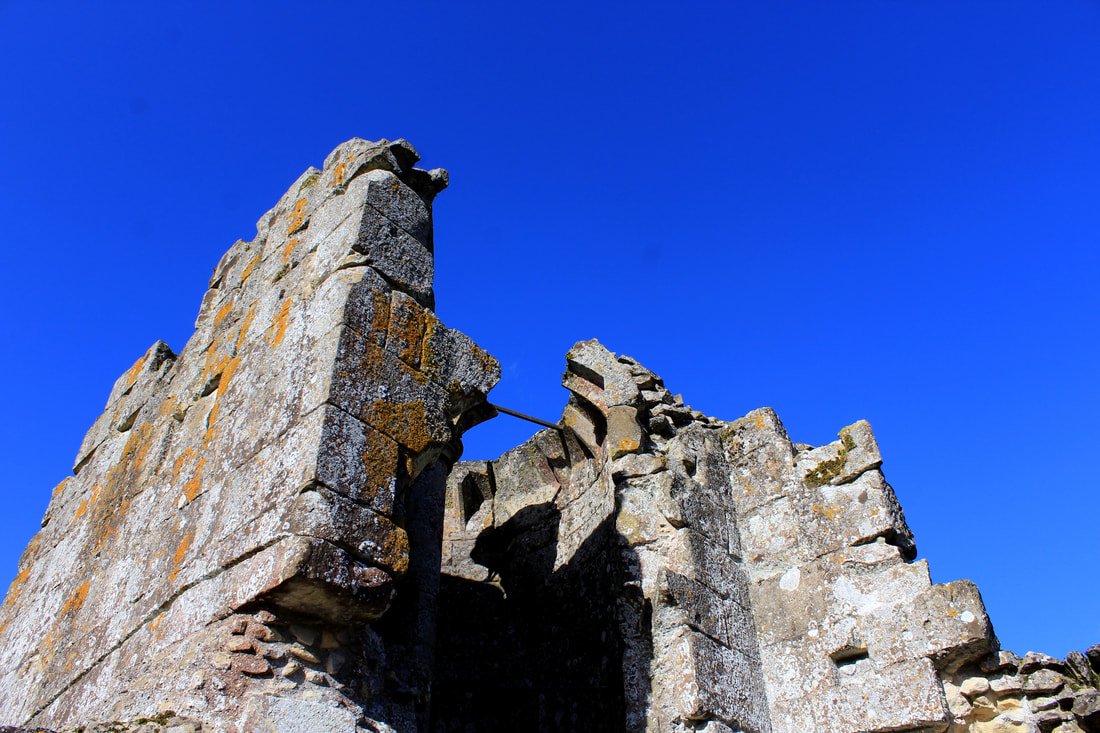
I have photographed a destroyed castle not far from where I live.
The settings/techniques I have used are natural lighting, angle, composition, photoshop, aperture from f/4.5 to f/11, ISO of 100 and shutter speed of 1/250.
What went well was that I managed to take way over 24 images and the composition makes them look unique as well as interesting and professional. I'm really happy with how these pictures turned out and I think they are the best ones I've took so far.
I personally think there's not much I could've done to improve this shoot.
My target for next shoot is to keep trying to take over 24 images and to keep considering the composition to try and make my images look more interesting and eye catching.
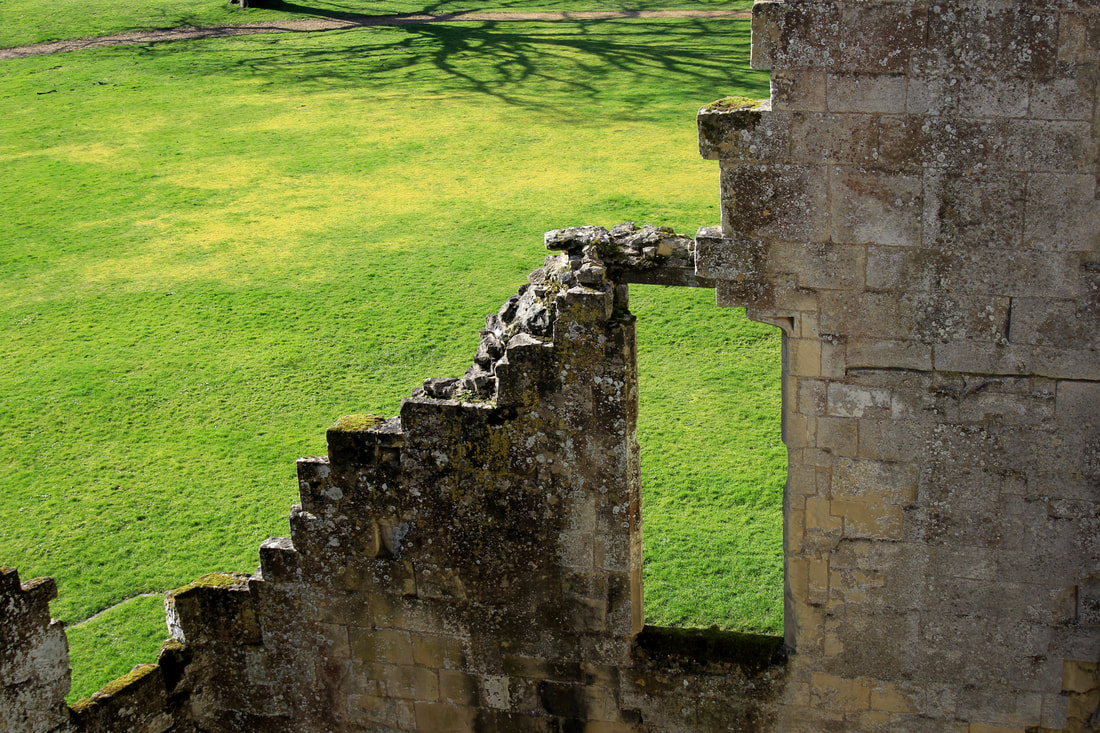
21st March 2019- Shoot 8+9
I've really enjoyed taking pictures of discarded buildings so I decided to carry on doing so. This weeks shoot is going to be my last shoot and I'm going to be using the pictures I will take for my final piece. The place I'm going to next is an abbey in Wales called 'Tintern Abbey'. Tinter Abbey was founded on 9th May 1131 and was the second Cistercian foundaton in Britain.
I've really enjoyed taking pictures of discarded buildings so I decided to carry on doing so. This weeks shoot is going to be my last shoot and I'm going to be using the pictures I will take for my final piece. The place I'm going to next is an abbey in Wales called 'Tintern Abbey'. Tinter Abbey was founded on 9th May 1131 and was the second Cistercian foundaton in Britain.
Shoot Plan
For this shoot I will try and focus on the composition to try and capture the ruins as best as I can. I will try to make my pictures look eye catching and unusual to give them their own flare to it. After the shoot I will slightly edit my photos on photoshop
For this shoot I will try and focus on the composition to try and capture the ruins as best as I can. I will try to make my pictures look eye catching and unusual to give them their own flare to it. After the shoot I will slightly edit my photos on photoshop
The Shoot


Editing Process


I tried not to overcomplicate the editing of these pictures so I only adjusted the levels, contrast, brightness, exposure, and gamma correction. All I wanted to achieve through the editing is make the colours stand out more so the photo doesn't look so bland.
Final Images
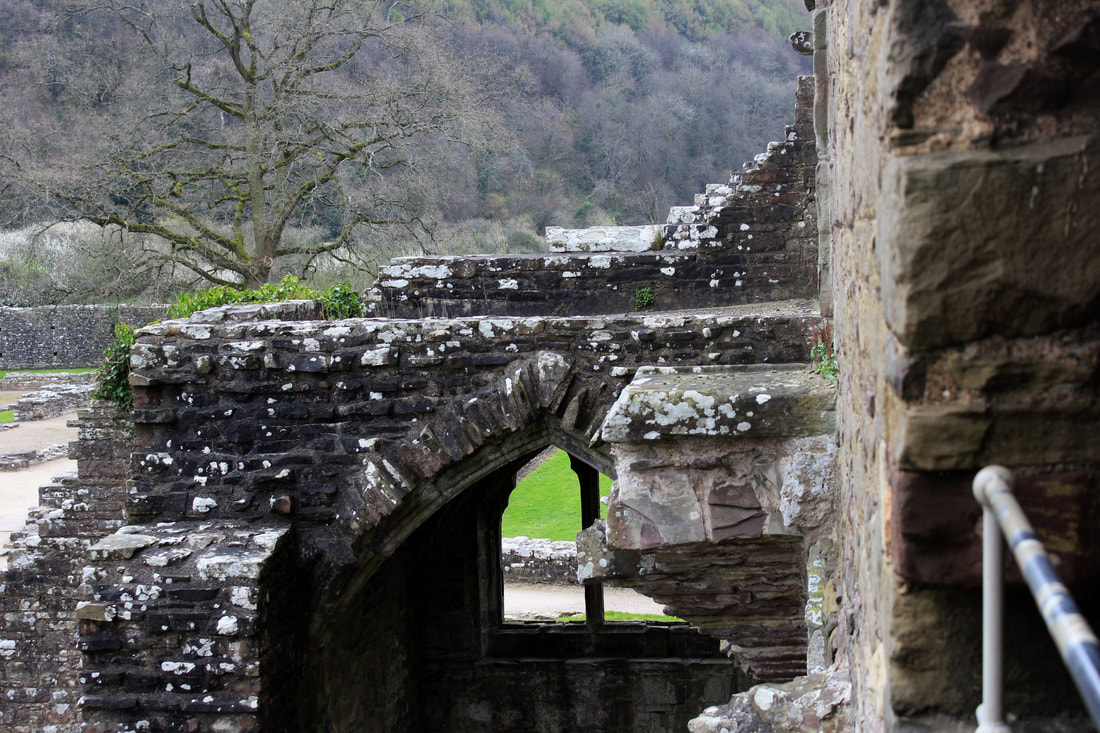
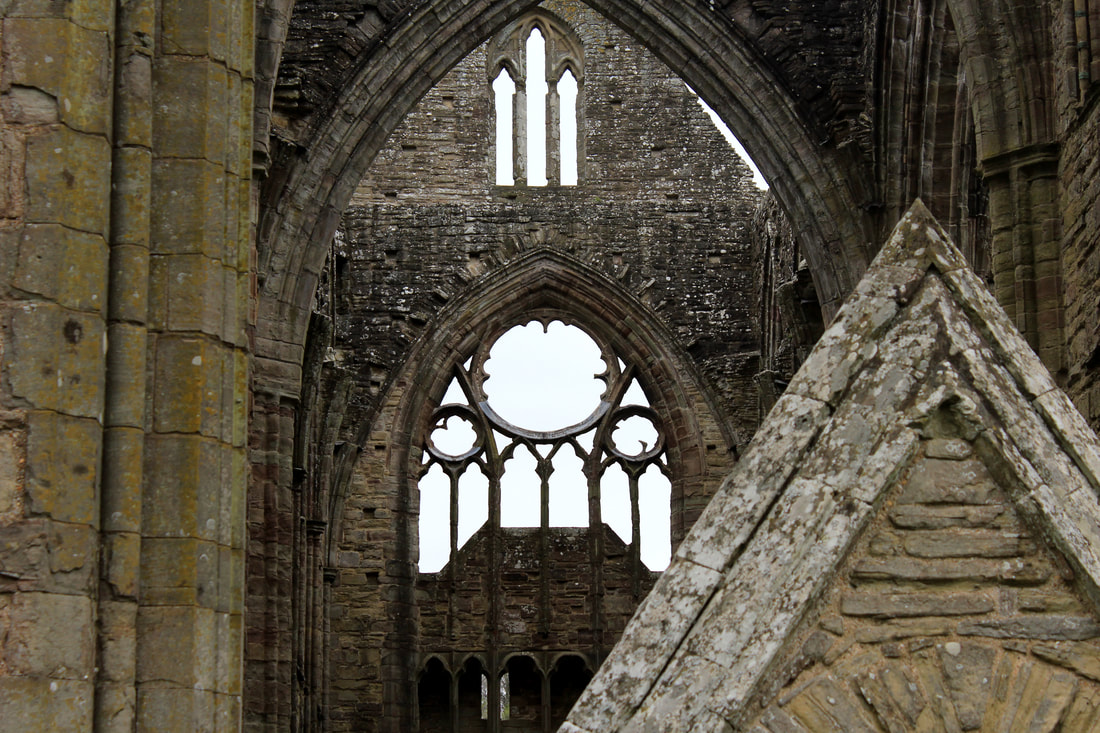
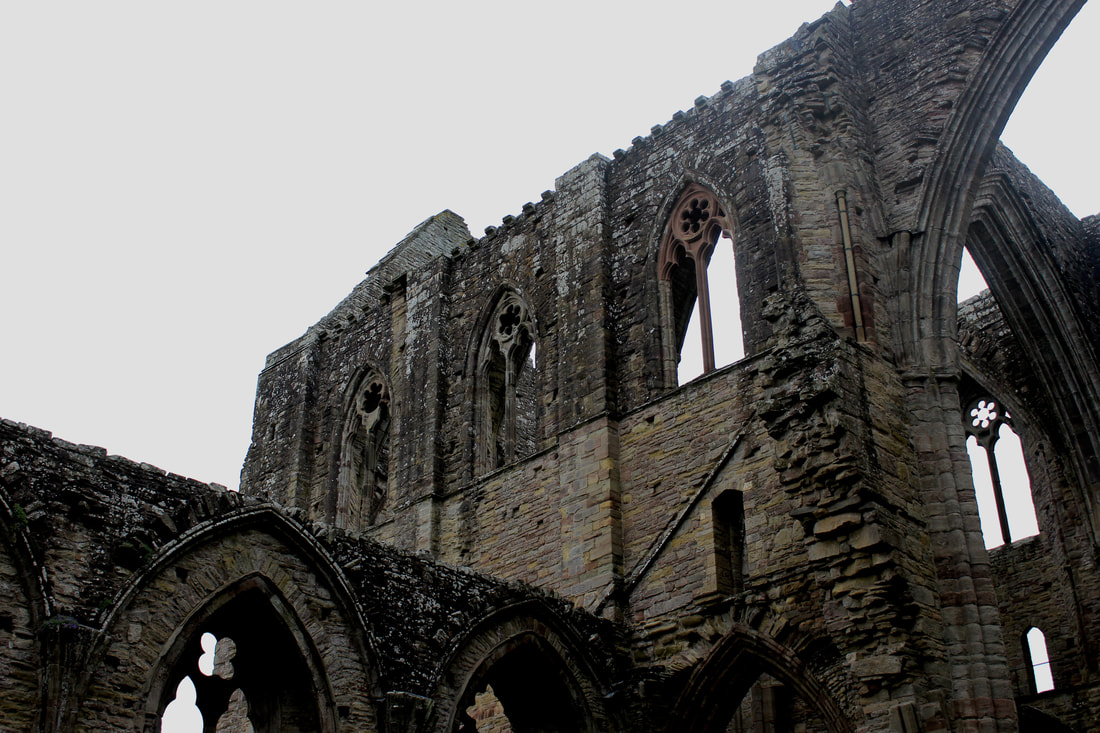
I have photographed a discarded abbey not far from where I live.
The settings/techniques I have used are natural lighting, angle, composition, editing, aperture from f/5 to f/5.6, ISO from 100 to 250, and shutter speed of 1/250.
What went well was that I managed to take over 24 images and kept in mind the composition to make my images more interesting and eye catching. I think I managed to show how buildings change over time pretty well.
I think my shoot could be even better if there were more elevated place you could go up because I feel like I couldn't reach my full potential with this shoot. I also think my shoot could've been better if I took pictures on a more sunny day as now they look pretty dull and uninteresting.
1st April 2019- Project Analysis
AO1: I began this project by researching a variety of photographers online whose work expressed the theme of 'Discarded Items'. I have chosen Eian Kantor, Chuck Haupt, and Liam Frankland. Eain Kantor was one of the names on the exam paper and the other two photographers I've discovered on different websites. Throughout the project I've been using Liam Frankland's photography as an inspiration to make my photographs look more eye catching. He tends to shoot his subjects looking through things like fences and gates and has quite a lot of negative space in his pictures. I tried doing a similar thing whilst taking mine.
I explored the theme of 'Discarded Items'. At first I started off my project photographing abandoned items and rubbish around my neighbourhood but I didn't think photographs like that had much potential. I also thought it was a pretty monotone thing to photograph and after a while I'd get quite bored of it. In order to improve my project I decided to move onto a different aspect of 'Discarded Items' which is buildings. I tried going to old, abandoned, and pretty ruined places around where I live so that my further shoots can contrast with my beginning shoots and to show how I've developed my ideas throughout the project.
Throughout my project I addressed quite a few of the'Threshold Concepts'. They were:
#1- Photography has many genres- Whenever someone thinks of photography they usually think about family photos, landscape images, photographs of animals, and model photography. Not many people think of photographing rubbish like I have done. Through doing so I think I might've defied expectations of photography showing it has many different genres and if done properly can look very powerful and eye-catching. I think this is what made my project differ from other people's projects.
#6- Photographs consist of formal and visual elements and have their own 'grammar'- I tried to include as many formal and visual elements throughout my project as I could. The elements that came up in my work most often were focus, space, and tone. I think focus was the formal element that I used the most throughout the whole project as I have been using manual focus to take my pictures in order to achieve a varied depth of field in all of my images. As well as using the formal elements I tried to achieve 'grammar' in my pictures; I wanted to show how buildings change overtime.
#10- Photographs warp our sense of time- When I first started my project my photographs didn't mean anything. They were just pictures of rubbish. As time went on I wanted to try and convey a "message" through my images. I wanted to show how over time buildings change and what happens to them. I also wanted to show how discarded buildings can get. I think I managed to show that pretty well, especially in my final piece.
AO2: With every shoot I did I tried to follow a similar pattern; find an interesting place to visit, take over 24 pictures at my chosen location, edit my photos on photoshop. For me this technique worked really well, for others it may not. Whenever I went somewhere to take pictures I always tried not to over complicate any of my images. I wanted them to look simple but powerful. I think I managed to achieve that right from the start of my project. That also applies to my editing after taking the pictures, I didn't want to over complicate them during that process either. I tried to keep my editing short but sweet. I would usually edit the levels as well as the brightness and the gamma corrections. For some shoots I edited the photos in black and white.
As my project developed I wanted to develop my pictures however that wasn't always the case. From the most recent shoot I did I was supposed to use the photos for my final piece but I was very unhappy with how the shoot turned out. I think it was mostly because of the weather but also because of the location I decided to shoot at. It was a very gloomy day which resulted in my photos not looking as great as they could've looked. They were very dark and also the place I was taking my pictures at wasn't the best either. I decided to go to an old Abbey in Wales because the place looked very interesting and I thought my pictures would look really good. It was a very interesting location however it wasn't good for taking pictures. The building was very tall and there was no way of being able to go up a few floors, from apparent reasons. That resulted in me having to take pictures from the bottom of the Abbey and I didn't really know how I could make my photographs good. The location had a lot of potential I just didn't know to use it. Instead I decided to use the images from the shoot before that because I liked how they turned out and they were my best photographs from the whole project
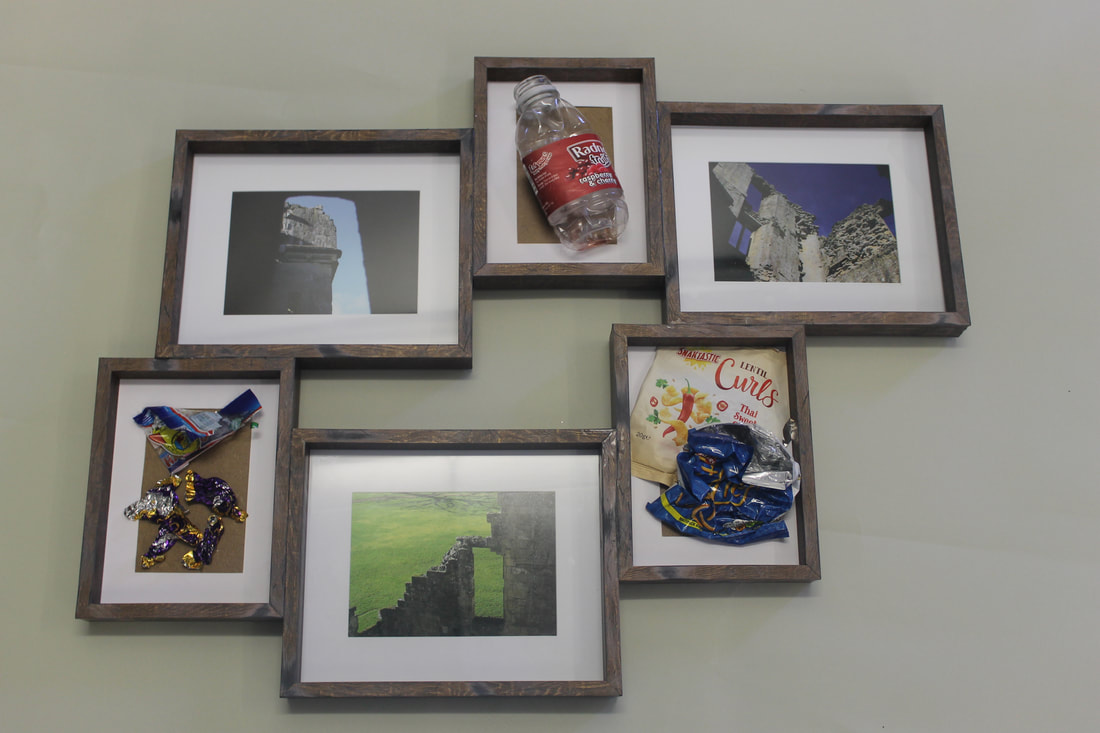
AO4: For my final piece I decided I'm going to have a collage of distressed frames and in some of them I'm going to have bits of rubbish I have found out on the streets and in others I will have my final images. I discovered that idea after looking on pinterest for some inspiration as I was struggling to think of what I could do and I didn't really want to repeat myself with using mount board. The easiest option was to buy an already made distressed frame however I either couldn't find one I liked or they were too expensive. I decided I was going to make my own in the exam. For that I needed: 6 frames (3 small and 3 big), wood glue to stick my frames together, rubbish for the small frames, and sand paper and some tools to distress my frames.
My plan for the exam was that on the first day I will make my big frame and on the next day I will print out my images and stick the rubbish in the frames. On the first day I managed to distress all of my frames pretty quickly which I was very happy about, however I had a very big issue with sticking them together. My glue that I bought, which was specifically for wood, wasn't sticking my frames together which made everything very difficult. I tried using a hot glue gun but that also didn't work. One of the caretakers was kind enough to help me stick my frames together. On the second day I printed all of my final images out and I prepared my small frames. I had a problem with my final images for a while because they were printing out purple but I managed to get that under control. Unfortunately my photos turned out a bit darker than what they were supposed to look like.
Everything I did in my final piece I wanted to link back to my original theme which was 'Discarded Items'. I distressed my frames to make them look used and as if I found them somewhere on the streets, my final images link in with the idea of discarded buildings and the bits of rubbish that I stuck on link right to the beginning of my project when I was taking pictures of rubbish. I wanted everything to link in with each other which I think I managed to achieve really well.
Below is a picture of my final piece:
AO1: I began this project by researching a variety of photographers online whose work expressed the theme of 'Discarded Items'. I have chosen Eian Kantor, Chuck Haupt, and Liam Frankland. Eain Kantor was one of the names on the exam paper and the other two photographers I've discovered on different websites. Throughout the project I've been using Liam Frankland's photography as an inspiration to make my photographs look more eye catching. He tends to shoot his subjects looking through things like fences and gates and has quite a lot of negative space in his pictures. I tried doing a similar thing whilst taking mine.
I explored the theme of 'Discarded Items'. At first I started off my project photographing abandoned items and rubbish around my neighbourhood but I didn't think photographs like that had much potential. I also thought it was a pretty monotone thing to photograph and after a while I'd get quite bored of it. In order to improve my project I decided to move onto a different aspect of 'Discarded Items' which is buildings. I tried going to old, abandoned, and pretty ruined places around where I live so that my further shoots can contrast with my beginning shoots and to show how I've developed my ideas throughout the project.
Throughout my project I addressed quite a few of the'Threshold Concepts'. They were:
#1- Photography has many genres- Whenever someone thinks of photography they usually think about family photos, landscape images, photographs of animals, and model photography. Not many people think of photographing rubbish like I have done. Through doing so I think I might've defied expectations of photography showing it has many different genres and if done properly can look very powerful and eye-catching. I think this is what made my project differ from other people's projects.
#6- Photographs consist of formal and visual elements and have their own 'grammar'- I tried to include as many formal and visual elements throughout my project as I could. The elements that came up in my work most often were focus, space, and tone. I think focus was the formal element that I used the most throughout the whole project as I have been using manual focus to take my pictures in order to achieve a varied depth of field in all of my images. As well as using the formal elements I tried to achieve 'grammar' in my pictures; I wanted to show how buildings change overtime.
#10- Photographs warp our sense of time- When I first started my project my photographs didn't mean anything. They were just pictures of rubbish. As time went on I wanted to try and convey a "message" through my images. I wanted to show how over time buildings change and what happens to them. I also wanted to show how discarded buildings can get. I think I managed to show that pretty well, especially in my final piece.
AO2: With every shoot I did I tried to follow a similar pattern; find an interesting place to visit, take over 24 pictures at my chosen location, edit my photos on photoshop. For me this technique worked really well, for others it may not. Whenever I went somewhere to take pictures I always tried not to over complicate any of my images. I wanted them to look simple but powerful. I think I managed to achieve that right from the start of my project. That also applies to my editing after taking the pictures, I didn't want to over complicate them during that process either. I tried to keep my editing short but sweet. I would usually edit the levels as well as the brightness and the gamma corrections. For some shoots I edited the photos in black and white.
As my project developed I wanted to develop my pictures however that wasn't always the case. From the most recent shoot I did I was supposed to use the photos for my final piece but I was very unhappy with how the shoot turned out. I think it was mostly because of the weather but also because of the location I decided to shoot at. It was a very gloomy day which resulted in my photos not looking as great as they could've looked. They were very dark and also the place I was taking my pictures at wasn't the best either. I decided to go to an old Abbey in Wales because the place looked very interesting and I thought my pictures would look really good. It was a very interesting location however it wasn't good for taking pictures. The building was very tall and there was no way of being able to go up a few floors, from apparent reasons. That resulted in me having to take pictures from the bottom of the Abbey and I didn't really know how I could make my photographs good. The location had a lot of potential I just didn't know to use it. Instead I decided to use the images from the shoot before that because I liked how they turned out and they were my best photographs from the whole project
AO4: For my final piece I decided I'm going to have a collage of distressed frames and in some of them I'm going to have bits of rubbish I have found out on the streets and in others I will have my final images. I discovered that idea after looking on pinterest for some inspiration as I was struggling to think of what I could do and I didn't really want to repeat myself with using mount board. The easiest option was to buy an already made distressed frame however I either couldn't find one I liked or they were too expensive. I decided I was going to make my own in the exam. For that I needed: 6 frames (3 small and 3 big), wood glue to stick my frames together, rubbish for the small frames, and sand paper and some tools to distress my frames.
My plan for the exam was that on the first day I will make my big frame and on the next day I will print out my images and stick the rubbish in the frames. On the first day I managed to distress all of my frames pretty quickly which I was very happy about, however I had a very big issue with sticking them together. My glue that I bought, which was specifically for wood, wasn't sticking my frames together which made everything very difficult. I tried using a hot glue gun but that also didn't work. One of the caretakers was kind enough to help me stick my frames together. On the second day I printed all of my final images out and I prepared my small frames. I had a problem with my final images for a while because they were printing out purple but I managed to get that under control. Unfortunately my photos turned out a bit darker than what they were supposed to look like.
Everything I did in my final piece I wanted to link back to my original theme which was 'Discarded Items'. I distressed my frames to make them look used and as if I found them somewhere on the streets, my final images link in with the idea of discarded buildings and the bits of rubbish that I stuck on link right to the beginning of my project when I was taking pictures of rubbish. I wanted everything to link in with each other which I think I managed to achieve really well.
Below is a picture of my final piece: